Restore Leadlight Windows

Treat your precious stained glass panels with TLC to keep them in tiptop shape and shining bright.
Glass has been around for thousands of years, with eastern Mediterranean cultures using silica, sand and ash to make it more than 3000 years ago.
They discovered that adding impurities such as metal oxides stained the glass a range of colours.
The Romans then began putting it into windows about 2000 years ago, giving rise to the stained glass window.
Over the last 1000 years, the making of windows from stained glass and leadlight has changed little.
Today, many glass studios offer tuition for the keen amateur.
Most stained glass and leadlight windows we see in Australia are those beautifully coloured and detailed ones that adorn Federation houses.
STAINED GLASS is glass that has been treated with a stain, with ‘yellow stain’ being among the most common treatments. It is created by staining the surface of the glass with a silver nitrate solution. The glass is then fired in a kiln to produce a variety of colours from pale lemon to rich orange.
LEADLIGHT is a term used to describe a window panel with pieces of glass bound together with slender bars of lead commonly known as cames, solder and a special cement.
The Victorians’ love of colour and detail made itself apparent in many forms. Their decorative glasswork consisted largely of leadlight panels using stained or etched glass.
These became more elaborate at the end of the 19th century, with very colourful and elaborate leadlights often fitted in front entrances of homes.
At night, the beautiful colours can be seen at their best, illuminated by soft indoor lighting and offering a warm welcome to any visitor.
By day, stained glass is best enjoyed from the inside, with sunlight streaming through the windows to bathe the room in colour.
Stained glass windows can also be painted with vitreous paints made up of a black or brown pigment. These are mixed with powdered glass and gum, along with iron or copper oxide.
These paints are typically thinly applied and used to create decorative motifs or the scenes depicted in church windows. The panes are then fired to fuse the paintwork to the glass.
Cut the glass
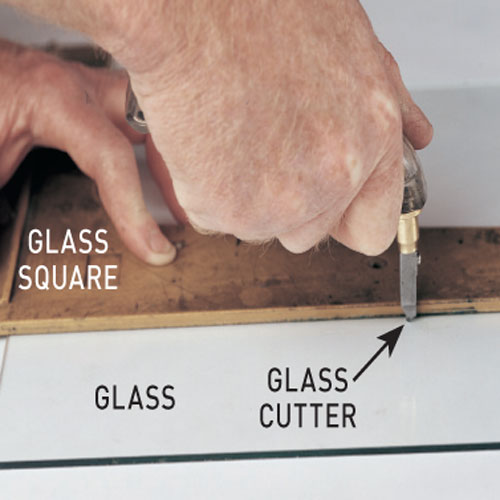
To repair leadlights, new glass will need to be cut safely and accurately. You’ll require a glass-cutter and glass square, or a non-slip ruler, for this job.
A tungsten-wheel oil cutter costs about $50, and this will have you cutting accurately in no time.
When working with glass, wear goggles and keep your workspace free from glass splinters and dust.
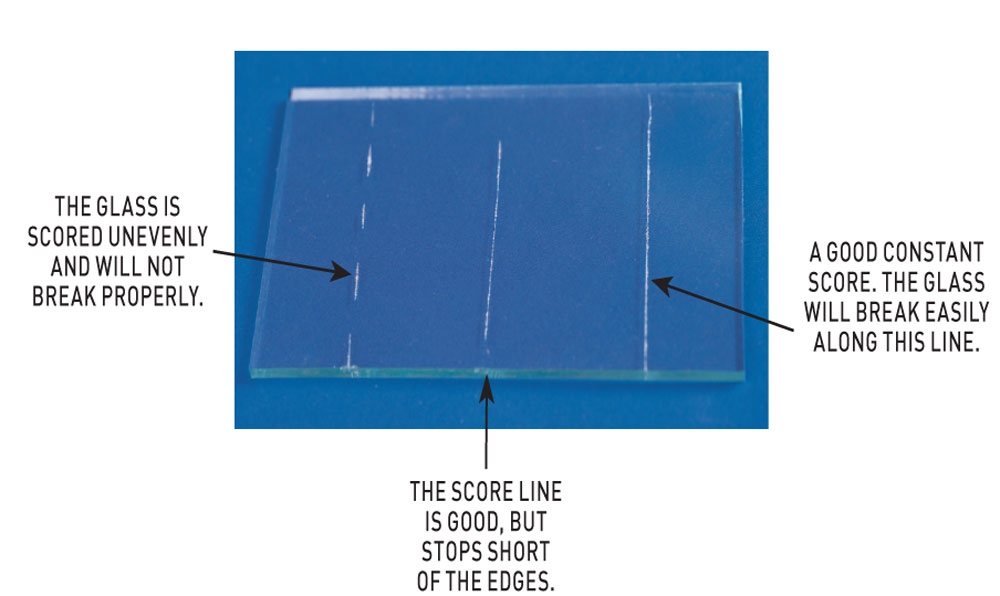
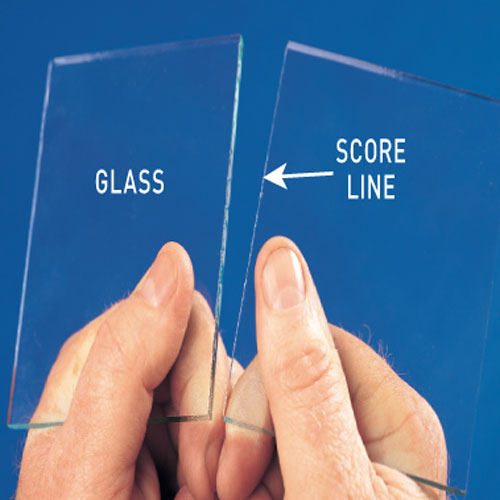
Start with the cutter about 3mm from the edge opposite you. If you start on the edge, it may run forward and chip the glass. Draw it slowly towards you with a firm, even pressure until a line is scored the full width of the glass.
It takes practice to get the pressure just right. Too much and the cutter will dull quickly, not enough and the glass won’t be scored correctly and will break unevenly as a result.
When glass is being scored correctly, it will hiss slightly as the cutter is drawn across the surface.
The right cut
How to cut the glass
Step 1. Hold the cutter
Hold the cutter perpendicular to the glass. Starting about 3mm from the edge of the glass, draw the cutter towards you with a firm, even pressure.
Step 2. Grasp the glass
Grasp the glass at each side of the score line, then roll your wrists and press down with your thumbs. A quick snap should give two even pieces.
Removing a pane
When you are removing the putty and glazing bead from the frame to release the glass, you need to proceed very carefully.
If you’re removing putty, chip it gently from the frame using an old chisel and a hammer. Don’t use a heat gun or you may damage the surrounding paintwork.
Use long-nose pliers to remove any nails in the rebate holding the window in the frame.
Expose the leadlight and move it to a clean, flat surface.
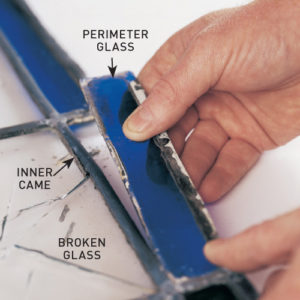
To remove the broken piece or pieces, work from the outside of the leadlight to the inside by gently snipping out the lead cames around the broken piece.
Finish the panes
After replacing a broken pane with new glass and soldering new lead cames, you need to strengthen and waterfproof the window frame.
This is a very messy job, so wear a mask, rubber gloves and coveralls.
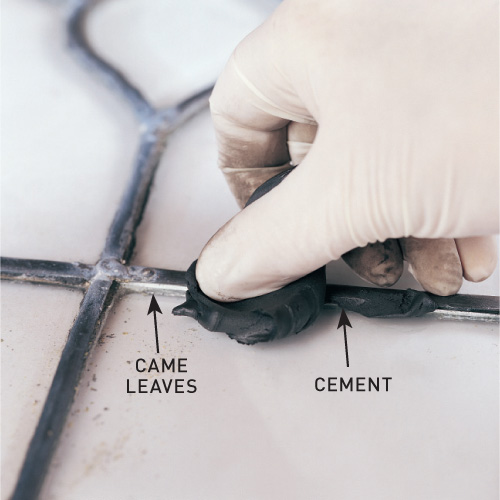
The cement that is used on the cames is impreg-nated with carbon black, a fine powder that gets into everything and is hard to remove. You’ll also need putty whiting.
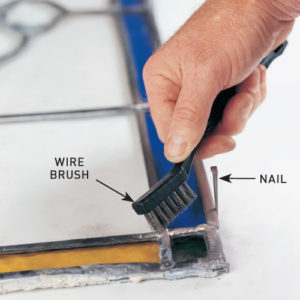
Cement and polish the cames
Step 1. Apply the cement
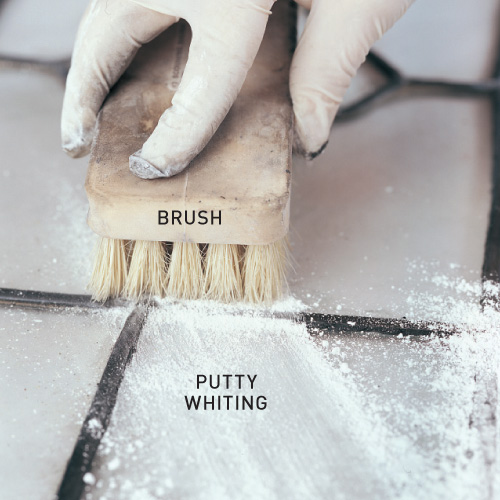
Roll a little cement in your palm, knead it until soft, then push it under the came leaves on each side. Scrape off the excess with a flat drive screwdriver. Sprinkle putty whiting onto the glass, which helps dry the cement and remove any residue.
Step 2. Work in the whiting
Gently rub the putty whiting over the cemented area using a brush with medium-stiff bristles. Wipe off the excess and let it cure for 12 hours. Rub a little black stove polish on the cames, avoiding getting any on the glass, then leave it to dry for 20 minutes.
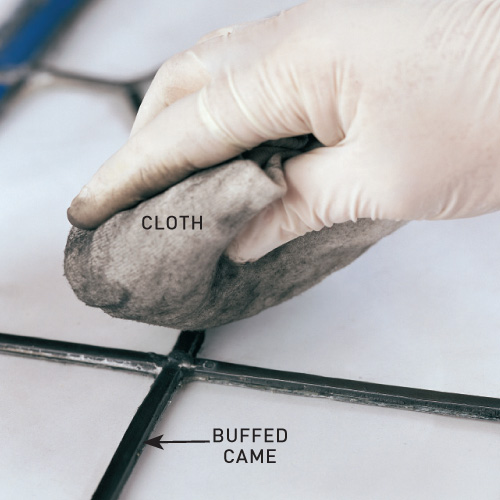
Step 3. Buff the lead cames
Using a soft-bristled brush, about as stiff as a shoe brush, buff the lead cames until you achieve a satin finish. Continue buffing using a clean, soft cloth for a finer polish. The more you buff, the better the result will be.
Install new glass and cames
Before cementing and polishing , the new glass needs to be installed.
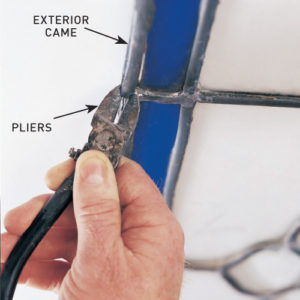
Using side-cutting pliers, snip the lead came at the soldered joints at each end of the section containing the broken glass. Carefully pull off the exterior piece of came. TIP Try to retain the damaged piece as a template for cutting the new glass.