Converting your gas BBQ from LPG to natural gas can be a great way to reduce running costs and saves you the hassle of chasing inconvenient gas bottle refills. Here’s how you can make it happen:
Step 1: Confirm Your Gas BBQ is suitable
Not every gas BBQ supports conversion to natural gas, so the first step is to ensure your BBQ is compatible. The instruction manual will reveal the answer, as will a compliance label on the BBQ.
Step 2: Request an Outdoors Gas Outlet
Book in a plumber to fit your home with an outdoors natural gas connection near the BBQ. A licensed plumber is legally required to install the gas line and provide a compliance certificate upon completion.

Image: Amazon
Step 3: Purchase a BBQ Conversion Kit
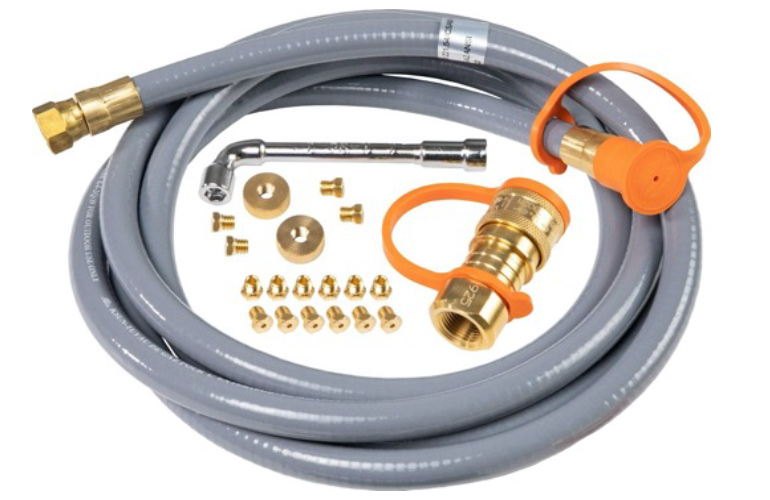
A natural gas BBQ conversion kit is the simplest way to make the switch from LPG. Setting this outdoor BBQ kitchen set can take less than half an hour so that you can enjoy cooking without running out of fuel half way through your meal. Every reliable hardware store and barbeque retailer should stock these kits. You can purchase one for between $100 – $200, and they come in various lengths with everything you need for the conversion.
Step 4: Remove the Burners
Once the LPG bottle is removed, confirm that the control knobs are in the off position and then it’s time to remove the burners.
Start by removing the hotplate and cooking grates.
Lift and remove the flame tamers which cover the burners.
Remove the burners by unclipping the cotter pin at either end. Some barbecues feature carryover tubes connecting the burners. If required, remove the cotter pin on each tube and lift these out ahead of the now disconnected burners.

Image: iStock
Step 5: Remove Existing Orifices
Within the gas BBQ, each burner is fed gas through a small brass orifice. However, a different flow rate is required for natural gas, so replacing the existing orifices with the new, larger ones included in the conversion kit is essential.
Equip yourself with the special tool included in the kit or a narrow socket wrench with a 9/32” bit.
Reach into the gas BBQ to where the burners connect with the BBQ. Insert the tool into each connection point, unscrewing the existing orifice by rotating it counterclockwise.
Once removed, keep these orifices safe for if you ever wish to swap back to LPG as a fuel source.
Repeat the process for each burner.
Step 6: Install New Orifices
Take the new brass orifices and reverse the process.
Insert the orifice over the thread at each burner and use the tool or socket wrench and tighten by rotating clockwise.
Repeat for each burner.
Step 7: Reassemble Gas BBQ
Start by reinserting the burners and placing the cotter pins back on each end. Then do the same with the carryover tubes if required.
Replace the flame tamers and then the hotplate and cooking grates.
Step 8: Convert Side Burner
If your gas BBQ has a side burner outside the main grilling area, it’s time to convert it over.
Start by reaching underneath and unscrewing the wing nut or screws that hold the side burner in place. The number, placement and type of nuts and screws can differ between BBQs.
Once it’s loose, remove the burner.
Where the burner connects to the BBQ will be an additional brass orifice. Use the tool or socket wrench to replace this with a new, larger orifice.
Fit the burner back in place and reattach the screws or nuts.

Image: iStock
Step 9: Connect Natural Gas Hose
Your natural gas BBQ conversion kit will include a replacement hose for connecting the gas BBQ to the home’s gas line.
Follow the hose to the end that connects to your barbeque. The connection may or may not be in a hard-to -each position.
Unscrew the hose by rotating it counterclockwise, and keep it in a safe place if you ever wish to reverse the natural gas conversion.
Attach the new hose and rotate it clockwise until the connection is tight.
Direct the hose out the back or side through a suitable space in the barbeque’s frame.
Note: Ensure the hose doesn’t touch a burner or any surface that heats up when cooking.
Attach the hose to the gas line that was fitted by a plumber or gas fitter.
Depending on the hose and fitting in use, it will be connected in one of two ways:
- Screwed in place similar to the other end.
- A bayonet fitting requires lugs to be aligned, inserted and then twisted to secure the connection.
Step 10: Test for Gas Leaks
Test the gas connection to ensure there are no gas leaks. The Victorian Government provides a handy guide for improving gas BBQ safety, including tips for leak detection.
Start by mixing water with dishwashing liquid or detergent in a cup or bowl.
Use your fingers to scoop bubbles from the top and place them over the connection points.
Open the required valves, and if the bubbles move or expand, then gas escapes.
You may need to tighten the connection or consider sealing it with Teflon tape or a liquid thread seal.
Once the connections are secure, you’re free to cook up a storm of steaks and snags or whatever is best enjoyed over an open flame.
This article was created in cooperation with Mr Emergency.

