How To Build A Pond
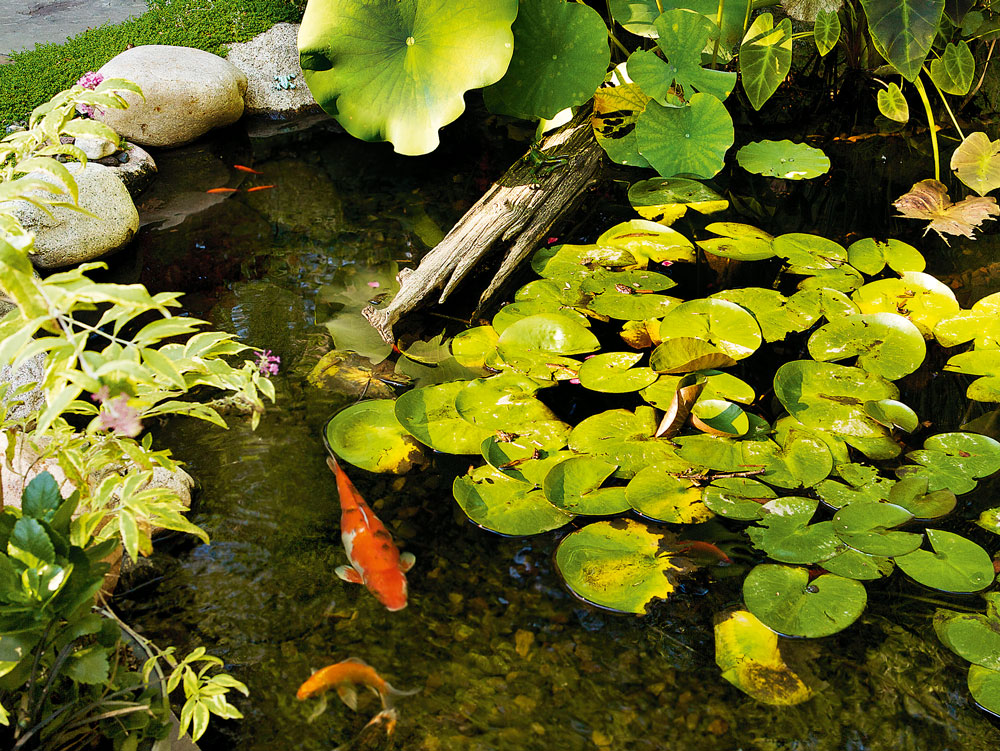
A full-sized pond in the garden is a serene feature that’s easy to create. It can bring new varieties of plants to a backyard and be a showcase for fish.
Selecting Plants
Aquatic plants filter pond water by absorbing metals, ammonium, nitrates and phosphates while adding oxygen.
Positioning plants around the outside of a pond provides shade and shelter for fish.
Some plants used in garden ponds have become highly invasive weeds that choke natural waterways. These include water hyacinth, salvinia, alligator weed, milfoil and water lettuce.
Choosing fish
Fish thrive best in a habitat that is similar to their natural environment. According to Matt Lai of The Fishworks (www.thefishworks.com.au), the most popular varieties are Koi, goldfish, rainbows and mountain minnows.
Unlike Koi that can demolish plants and grow too big for a small area, goldfish find comfort living among submerged plants as the leaves protect them from attacks by birds. They also eat the eggs of mosquitoes that may otherwise flourish.
Aerating the water
Buy a pump that circulates the water at least every two hours.
‘It’s a good idea to have a pump for a pond of any size,’ Matt says.
‘The only time you don’t need one is if the pond has a lot of water plants to use up the unwanted nutrients and if there are only a few small fish such as minnows and rainbow fish.’
Select a pump that will deliver the required flow rate, measured in litres per hour, and one with a suitable head height, which is the ability to push water uphill if required.If an outside powerpoint needs to be installed, have it wired by a qualified electrician.
Select a position
Use a spirit level to find a suitable area with no more than 75mm of slope over the length and width of the pond. Position it away from large or deciduous trees to minimise leaf litter.
Landscaping the edges
No specialised equipment is required unless you use paving for the surround that may need cutting.
How to install a pond
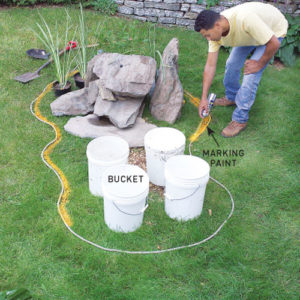
Step 1. Mark out the layout
Set out the buckets and feature rocks to make an outline of the pond shape using marking paint to transfer a rope outline on the ground. Use a shovel to excavate a two-tiered hole to 200mm deep at the shallow end and 600mm at the reservoir end.
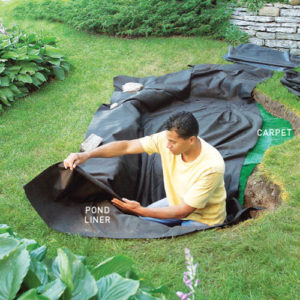
Step 2. Prepare the site
Dig out any sharp rocks and cut off any tree roots that may puncture the pond liner then line the hole with old carpet as protection for the liner. Unfold the pond liner and centre it over the hole, folding the edges to neatly follow the curve of the edge.

Step 3. Add the buckets
Drill 10mm diameter drain holes in all buckets using a twist bit. Backfill around the buckets with 20mm recycled concrete or gravel, keeping the height of the pump bucket 50mm below water level for easy access.
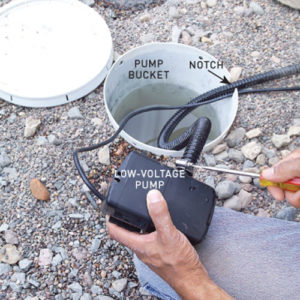
Step 4. Set up the pump
Clamp the flexihose to a low-voltage pump, positioning it in a bucket with a notch cut out of the rim for the cable and hose. Cut the flexihose to length and position it so water runs from the top of the spillway over the feature stones.

Step 5. Test the pump
Test the flow of water by adjusting the regulator valve then cover the pump bucket and gravel with 10mm pebbles. Add river stones, about $90 a tonne from a landscape supplier, position edging around the pond then fill it with water.
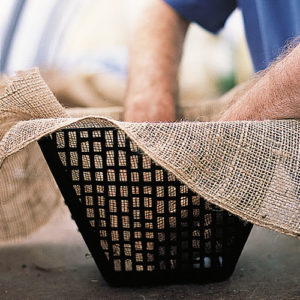
Step 6. Prepare the plants
Line a plastic basket with hessian to prevent soil leaking out then half fill it with compost or aquatic potting mix.
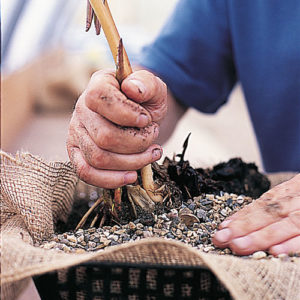
Step 7. Position the plant
Place the plant in the centre then pack soil around the roots and fill the basket to 30mm from the rim. Add gravel and pond water to settle the soil.
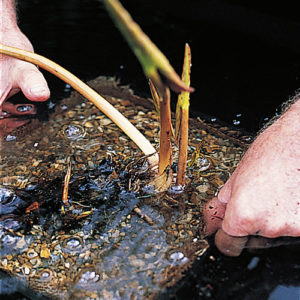
Step 8. Lower the basket
Submerge the basket into the water until the soil is saturated then move it into position in the pond. Stand a basket of water plants on bricks or rocks until the shoots reach the surface then lower it until it sits on the bottom.

Click the diagram
Follow the labelled diagram to create the pond. It has the name of all the parts to help you assemble the pond.
Vote It Up:

Points: 47