Easy-Install Balustrade

Add a decorative finish to a new verandah with a powdercoated aluminium safety feature.
Renovations can be a hefty blow to the wallet, so it makes sense to contribute some DIY labour to tasks that do not legally have to be done by professionals.
As part of a major renovation and extension to this Sydney home, an open-plan living space and 7.8 x 2.1m elevated covered verandah was added.
The family had small children and as the verandah stood 1000mm above ground, it was necessary to install a balustrade to meet safety regulations.
The balustrade panels would need to be secured to the masonry columns supporting the roof, one house wall and the tiled concrete verandah, and extend down either side of the steps.
Order the balustrade
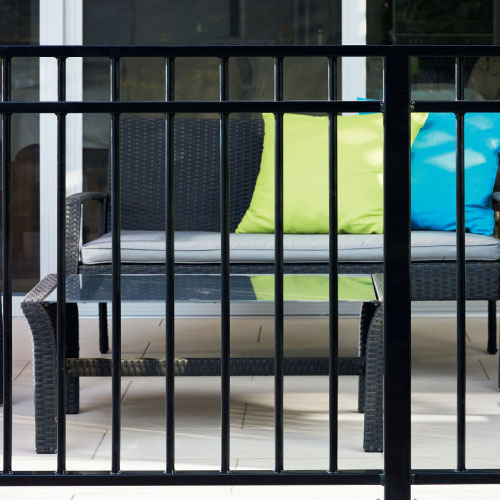
The range of options for deck and balcony balustrades include glass, timber and powdercoated aluminium.
For this site, a black balustrade from Protector Aluminium was installed DIY to give the verandah a modern and streamlined look.
They have a variety of designs, including the double top rail style of fence panels used here.
Standard 2000 x 1010mm panels and posts are available off the shelf, but for this project, specific sizes were required to fit between the columns and for raking down the steps.
To order custom sizes, visit the Protector Aluminium website and select your preferred design. Then submit the panel sizes you’ll require at a Bunnings Special Orders desk.
You’ll also need to measure the height of the landing, and also the dimensions of the steps, in order to fill out the calculation sheet for raked balustrades.
Once the paperwork is done you’ll receive a quote from Protector Aluminium, followed by detailed drawings for each panel.
You will have to sign off on the drawings after checking their accuracy and pay for the product before it can be manufactured.
Seating the posts
The method of securing the post bases depends on the substrate. If securing the balustrade to concrete, drill 10mm diameter holes and secure using 50 x 10mm stainless steel Dynabolts, or chemset 10mm threaded rod in position.
On a timber deck, secure the base plates to the joists using 50 x 10mm coachscrews or attach blocking between the joists and secure with coach screws or bolts, nuts and washers.
Installation basics
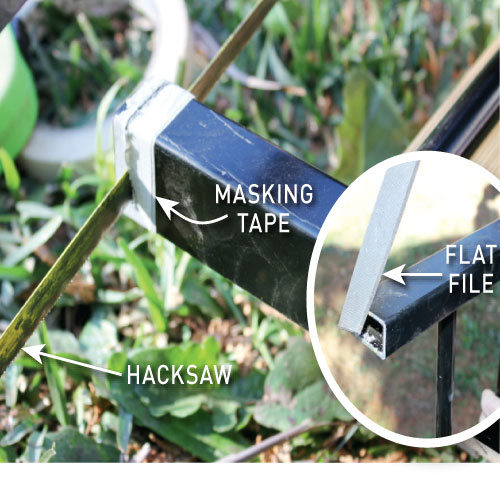
Step 1. Cut the balustrade
Cut the balustrade to length by measuring the opening and allowing 10mm of clearance so it is not a tight fit. Wrap masking tape around the rails to mark the cut lines. Use a hacksaw to trim away the excess, then remove the burrs using a flat file.
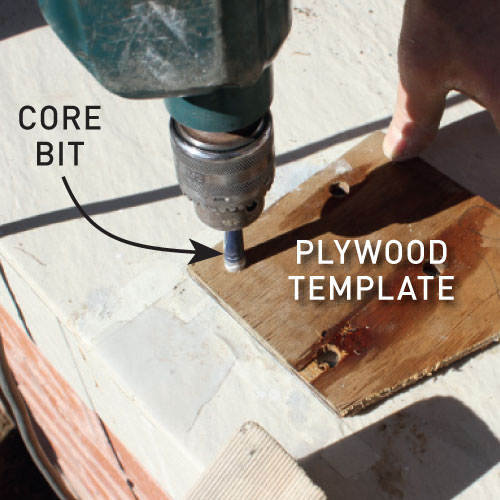
Step 2. Drill base plate holes
Drill base plate holes using a template. Cut a 150 x 150mm square of 6mm plywood, position it under the post base plate and mark the hole locations, drilling guide holes using a 10mm twist bit. Use the template to prevent the core bit skating off the mark.
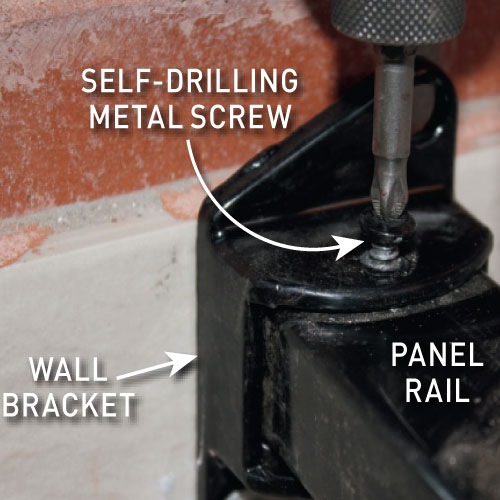
Step 3. Secure the rails
Secure the rails to the panel brackets using 16mm x 8g self-drilling Tek screws.
TIP Use a 3mm twist bit to drill a pilot hole through the top of each bracket and rail, to make it easier to secure them together.
Anchoring the rails
Powdercoated aluminium balustrade is easy to install DIY. Panels can be installed between and secured to solid masonry structures such as columns and walls, timber posts, or metal posts manufactured to match the panels.
The difference will be the method of fastening the panels in place.
ON MASONRY STRUCTURES slide the panel brackets over the rails. Use a hammer drill with a masonry bit to bore 8mm holes, then tap blue wall plugs into the masonry and secure the brackets using 30mm x 12g hex head timber screws.
FOR TIMBER POSTS use panel brackets over rail ends, drill 3.5mm pilot holes and secure brackets to posts using 65mm x 12g hex head timber screws.
FOR ALUMINIUM POSTS as supplied off the shelf, simply slide the sleeves fitted to the top of the posts into the top rail of the panel. Secure the panel brackets over the lower rail ends using 20mm x 12g self-drilling metal Tek screws or 4.8mm aluminium rivets.
The panels suit a variety of surfaces including brick, tile and timber


