DIY Custom Wardrobe
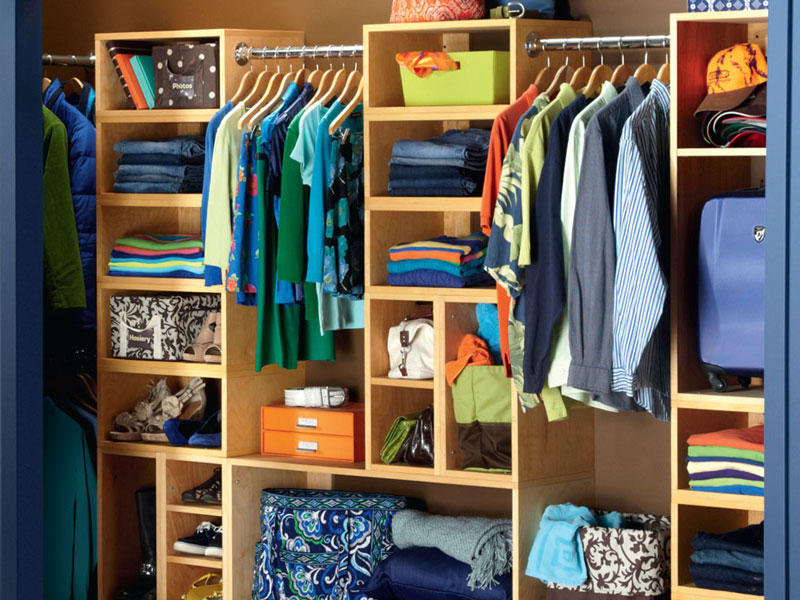
Stack simple plywood boxes to organise a closet and add storage compartments DIY.
Does your wardrobe resemble an untidy op shop, with insufficient space to store all your clothes? The easy answer is to install a larger one, but if space is tight, that’s not always an option.
We’ve devised a simple system that’s easy on the pocket, quick to build and can be customised to fit neatly into any space, large or small.
In just a weekend you can build several plywood boxes and install them as convenient wardrobe storage.
Configure the boxes to fit the size of the area and add stainless steel rods in between to create hanging space.
Materials for the two large and 15 smaller boxes that make up this wardrobe organiser cost about $460, plus $16 for the hanging rods.
Working with plywood
We used 19mm thick CD plywood because it is strong, can be secured with screws and has a simple grain and warm colour that finishes well.
A 2400 x 1200 x 19mm sheet of plywood costs about $75, with five needed to build these boxes.
If you don’t have a ute or trailer, have the sheets cut lengthways into 380mm wide pieces then prepare the panels DIY using our jig and a circular saw with a straightedge guide.
For accurate cuts, measure from the front and back of the blade to the edge of the base plate to ensure the blade is running parallel to it.
Check the blade is set at 90º to the base plate with a try square. Use a 40-tooth carbide blade for clean cuts and set the saw depth so it just grazes the jig base or you’ll cut it in half.
Making a jig
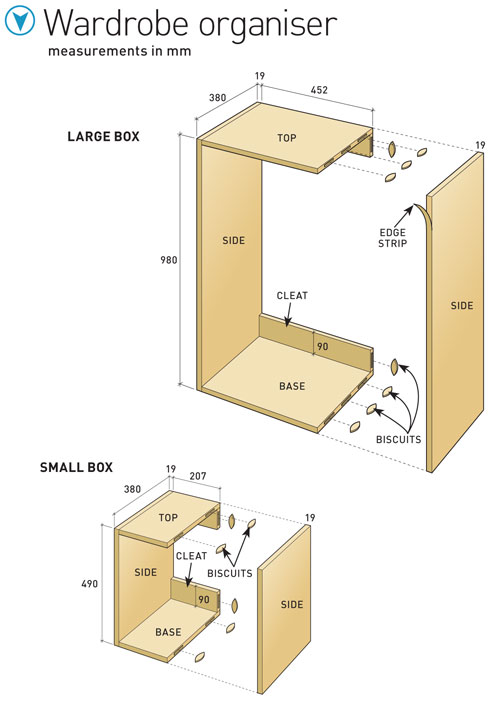
The key to this box system is that the large box is twice as tall as the small box, and the height of each box is equal to twice its width.
This provides versatility as the boxes can be combined in dozens of different configurations that all align.
To make the system work, you need lots of box parts that have been cut to exact identical lengths.
This can be achieved using a jig that can also be used for making bookcases, cabinets or shelves. Take your time assembling the jig.
First secure the saw guide to the saw carriage with screws, then run your saw against the guide to trim the carriage.
When you mount the carriage on the rails, which are made of pine, use a builder’s square to make sure the carriage is perpendicular to the rails.
Secure shims underneath the carriage on the rails so the plywood can slide under it with ease.
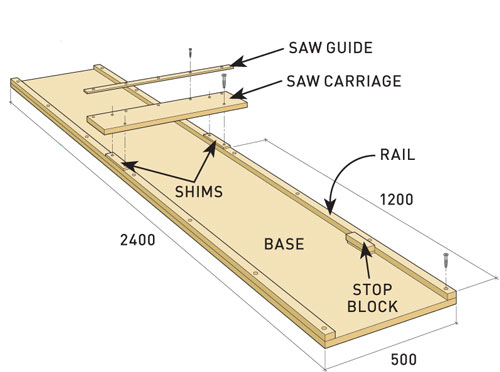
The key to this box system is that the large box is twice as tall as the small box, and the height of each box is equal to twice its width
Diagrams
Follow these diagrams to build these DIY custom plywood boxes.
