Build And Render A Brick Wall
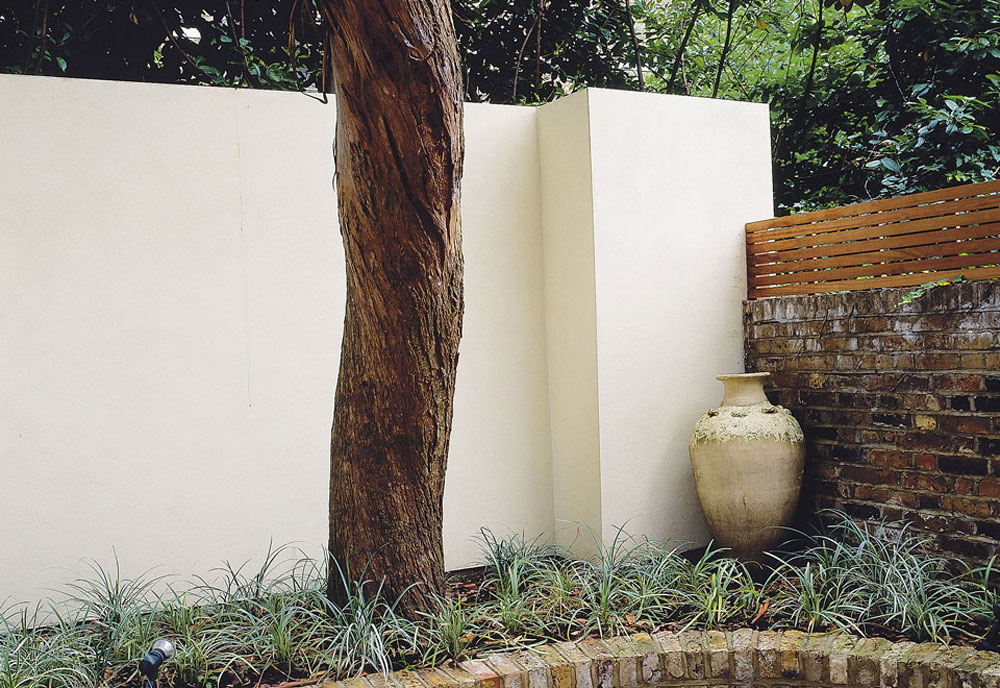
Build a structure on reinforced concrete footing then render and paint for a smooth finish.
There are three parts to building a solid exterior wall, including sinking the footing, laying the bricks and applying a smooth rendered finish. Tackle it as a complete DIY job or get a tradie to help with the tougher tasks such as the footing then do the bricklaying and rendering yourself.
Make it legal
Check council requirements as most building projects like this require a development application with plans and measurements. Wait for approval before beginning the work.
Building a solid wall
Sink the footing
To build the wall first excavate a trench for a reinforced footing using premixed concrete and a 200 x 350mm steel cage with 12mm bars.
Lay the bricks
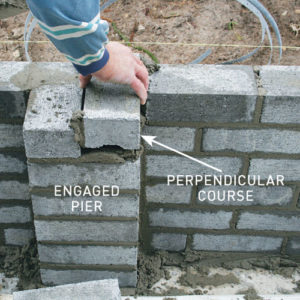
A single-skin wall is built on the footing with engaged piers on one side. Piers give structural strength and can support a bearer to carry joists for a deck or roof.
Apply the render
A 10mm thick layer of cement render is applied to both sides of the wall for a finish that can be painted or texture coated.
Rendering
Applying render does take some practice for a quality finish. When you get to the rendering stage of the project you can DIY by hiring a mixer to blend the components or hire a tradie to do a wall this size for about $800. Or DIY a roll-on render finish, texture coating or simply add a bagged finish.
How to make render
Mix render in a concrete mixer by add 12 parts fine washed beach sand, two parts Portland cement, one part fireclay or lime, and a capful of Bycol mortar plasticiser. Add enough clean water to the mixture to give it a creamy consistency.

Step 1. Excavate the trench
Mark out the trench squared off the existing wall and use a small excavator with a 300mm bucket to dig, checking the depth. Square the sides with a spade and remove debris.
TIP The trench required for this wall was 6000 x 300 x 500mm deep.

Step 2. Reinforce the footing
Position a prefabricated cage in the trench then lay lengths of steel pipe across it 1500mm apart, using tie wire to suspend the cage 50mm clear of the sides and floor.
TIP We used 6000mm lengths of 12mm three-bar steel cage.
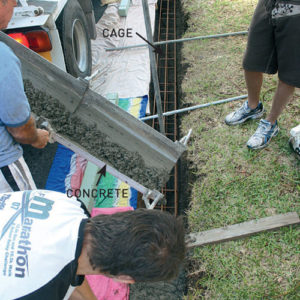
Step 3. Pour the concrete
As the concrete is poured, level it roughly and ensure the top of the cage is covered by 50mm then use a spirit level to screed the surface level.
TIP To find the volume of concrete multiply the trench dimensions 6000 x 300 x 500mm = 0.9 cubic metres.
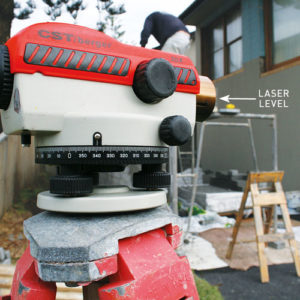
Step 4. Set the wall height
Use a laser level to mark the top of the wall on stakes braced 500mm beyond the ends, marking down in multiples of the brick height plus the mortar joint to mark the base course.
TIP We allowed 76mm for the bricks plus 10mm for the mortar.

Step 5. Build the corners
Mark the base course on the footing to build the corners, stepping out three brick lengths and up to seven courses high, spacing the corners so you don’t have to cut bricks to fit.
TIP Allow 240mm for the brick length and the mortar joint.
Step 6. Lay the bricks
Insert brickie line pins into mortar joints to set out a stringline. Spread and furrow mortar 25mm thick along a metre of the last course, mortar the end of each brick, bed and tap it to the stringline. Strike the joints flush with the brickwork, removing excess mortar.

Step 7. Add engaged piers
Position five courses of engaged piers parallel to the wall and every sixth course perpendicular to overlap and lock into the wall.
TIP We used five piers but you may need a different number depending on what your wall will be used for.
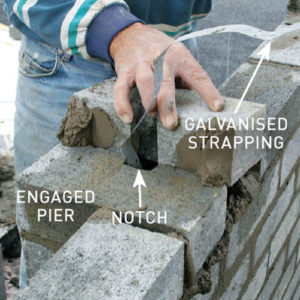
Step 8. Run the strapping
If installing a bearer position galvanised strapping between the wall and piers to secure it, notching the perpendicular bricks so the strapping goes freely between them. Continue laying courses to the top of the wall, using a spirit level to check for plumb.

Step 9. Complete the wall
Finish laying the wall bricks then the engaged piers, laying them up to a stringline below the top of the wall, leaving room for the bearer and joists.
TIP These piers ended 380mm from the top, allowing for a 240mm bearer and 140mm joists.
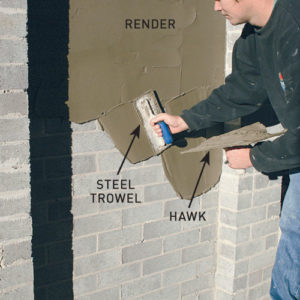
Step 10. Apply the Render
Lay dropsheets and dampen the wall then use a hawk render board and steel render trowel to apply the mix.
TIP Work from the top, applying render with short upward strokes then smoothing in a circular motion.

Step 11. Screen the render
First let it set slightly then screed with a straightedge, holding it vertically and working left to right in a sawing motion. Fill any depressions and smooth the surface again, leaving it to harden for up to 15 minutes.

Step 12. Smooth the render
First sprinkle it lightly with water then smooth in a circular motion using a timber float, detailing any corners using a small metal corner trowel to prevent damage later.

Step 13. Rub the surface
As the render firms and dries, rub the surface in a circular motion using a flat sponge.
TIP Leave the wall to cure for four weeks. Before painting rub it with a brick to remove the sand film.
Vote It Up:

Points: 5